Next: Bibliography
Up: Building an IDE plugin
Previous: Building an IDE plugin
Subsections
The plugin is open source and is freely available at the sourceforge.net
homepage at
http://emeraldlanguage.sf.net/http://emeraldlanguage.sf.net/.
There is two ways in which to install the plugin. Manual installation
and automatic installation through an update site. The second way is
highly recommended as it's easier and it gives you the
opportunity to keep up to date with any new releases or updates of the
plugin.
For the manual installation you have to follow these steps:
- Download the package from the project page at:
http://www.sf.net/projects/emeraldlanguage/
http://www.sf.net/projects/emeraldlanguage/.
(As of writing you need to
download the file dk.diku.emerald-1.0.0.zip as the current version is
1.0.0)
- Unzip this package in your eclipse directory. As an example, if
your eclipse directory is /opt/eclipse, you should check that there is
a plugins directory in there. If you then unzip the package into the
eclipse directory - /opt/eclipse - the plugin will automatically
end up in plugins directory.
- Restart Eclipse. The plugin is now installed and ready to be used.
For the automatic install you have to follow these steps:
- Start up eclipse.
- Push Help->Software Updates->Find
and Install.
- Choose 'Search for new features to
install' and push Next.
- Push 'New Remote Site'.
- Enter a name for the site (eg. Emerald Language Plugin), and write
http://emeraldlanguage.sourceforge.net/updates/ in the URL.
- Select the newly created remote site (It will connect to the site
and a new menu item called Emerald Language Plugin will appear. Make
sure this is checked also). Push Next.
- Choose the Emerald Plugin feature (dk.diku.emerald.feature) and
click Next.
- Push 'I accept the terms in the license
agreement' and click Next.
- Optionally choose install location. For the default value just push Finish
- The installation process will start and you will be asked if you
wish to install the plugin. Just click Install.
- Finally restart Eclipse when you are asked to do so. The plugin is
now installed and ready to be used.
Let's get started on the tour around the plugin.
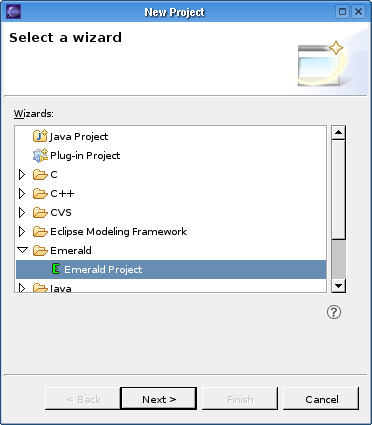
We will start by creating a new Emerald project. Do this by pushing
'File->New->Project...'
which will bring up the following screen (figure 1.1).
Select 'Emerald Project' to start the 'New Emerald project' wizard.
Figure 1.1:
Select 'Emerald Project' to create a new project.
|
|
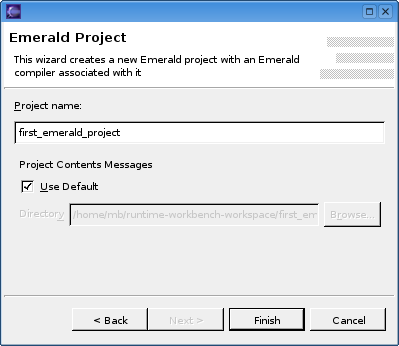
This will bring you to the first page of the wizard (figure
1.2).
Here you can write a name of your project as well as optionally choose
where in the filesystem the project should be stored.
Let's call our project
'first_emerald_project' (emx does
not accept filepaths that have spaces in them, and if you put spaces in
your project name there will be spaces in the filepath, so don't do that). The
default location in the filesystem should be alright. Finally click
'Finish' to create the project.
Figure 1.2:
Enter name of the project
and optionally the location for the project in the filesystem.
|
|
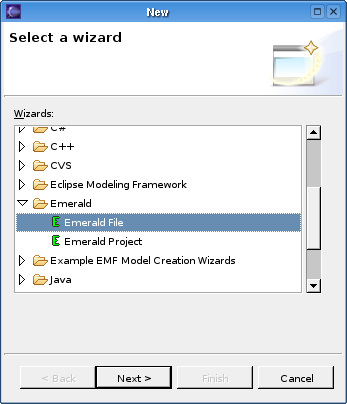
The next thing we will do is to create a new Emerald file. So
let's start the 'New Emerald
file' wizard. You can find it on
'File->New->Other...'
which will bring up the following screen (figure 1.3).
Select
'Emerald file' to start the wizard.
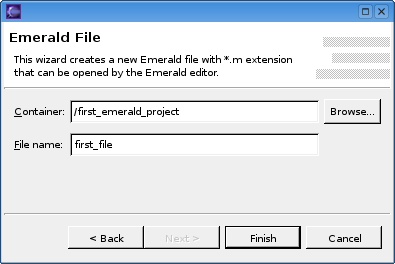
The 'New Emerald file' wizard has two
options you can change. The first option is the container into where
the new file will be put. If you had selected our newly created project
before you started the wizard, then it would be selected already as it
is in the following illustration (figure 1.4). Otherwise
just
choose the desired container with
Figure 1.3:
Select the 'Emerald File' entry to start the wizard
|
|
the 'Browse...' button.
Let's just call the new file
'first_file'. Push
'Finish' to end the wizard and create
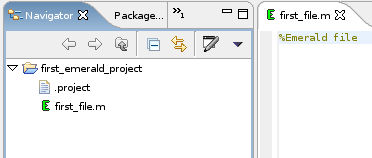
the file. Now that the new file is created it will be visible under the
'First Emerald Project' project in
the package explorer or the navigator depending on what you prefer.
Notice that the wizard have automatically appended a
'.m' to the filename that you
chose(figure 1.5). This is the standard extension for
emerald
source files. The emerald editor has also been opened on the file for
you to start editing in.
Figure 1.4:
Select a container for the file and give it a name.
|
|
Figure 1.5:
An '.m' has automatically been appended
and the emerald editor has been opened on the file.
|
|
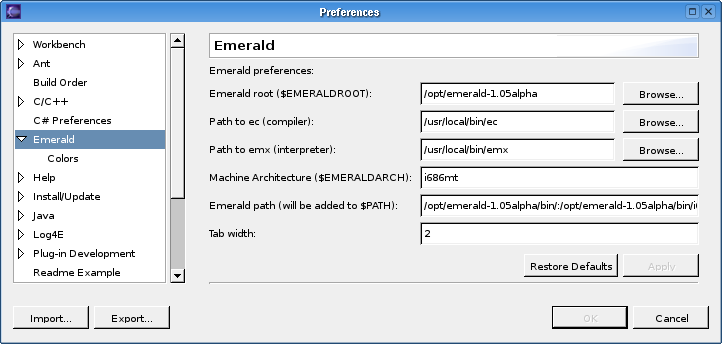
Before we create our first program we have to set up the preferences for
the plugin correctly. Click
'Window->Preferences->Emerald'
to get there (figure 1.6).
Figure 1.6:
The preference page for the emerald plugin.
|
|
The different options are:
- Emerald root
This is the same as the EMERALDROOT environment variable you set, when
you installed emerald. It has to be set to the directory where you
installed emerald. In my example it is set to /opt/emerald-1.05alpha.
- Path to ec
This is the path to the ec emerald command line compiler. In my example
it is set to /usr/local/bin/ec, which is the default location if you
did a root install.
- Path to emx
This is the path to the emx emerald interpreter. In my example it is set
to /usr/local/bin/emx, which is the default location if you did a root
install.
- Machine Architecture
This is the machine architecture of your system. On linux the output of
the arch command should suffice. In my example it is set to i686mt
which should be alright for most Intel style pc's.
- Systems Path
This is the same as the PATH environment variable. At the moment it is
necessary to copy&paste in the value of this variable for the plugin
to work. Work is being done to eliminate the necessity to do this.
- Emerald Path
This should be the path to the bin directory in your install directory
as well as the architecture directory inside the bin directory,
separated by a ':'. In my example it
is set to
/opt/emerald-1.05alpha/bin:/opt/emerald-1.05alpha/bin/i686mt.
- Tab width
This is to set the tab width in spaces of tabs in the editor.
- The colors subpage
In this preference page, which is a subpage of the main emerald
preference page, you can set what colors should be used for syntax
highlighting in the editor.
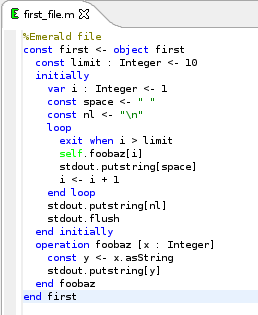
Now we are ready to write our first program in emerald. We will start
with something simple. The following program prints out the numbers 1
to 10 and exits (figure 1.7).
Figure 1.7:
first_file.m - our first program
![\begin{figure}\begin{verbatim}%Emerald file
const first <- object first
const...
...x.asString
stdout.putstring[y]
end foobaz
end first\end{verbatim}
\end{figure}](img1.png) |
Write or copy this program into the editor that was opened in
eclipse for the first_file.m file. As you can see the code will be
automatically highlighted to ease reading (figure 1.8).
Figure 1.8:
The editor highlights the code.
|
|
Another thing that happens automatically, when you save the file in
the
editor, is that the file is compiled by the emerald compiler. This is
done in the background, so you probably won't notice
it, except that a new file might popup in the package explorer called
first_file.x (if it doesn't, right-click the
first_emerald_project project and click
'refresh'). This file is the bytecode
file resulting from the compilation of your program. As it is not
editable and we as such don't need it to clutter up
our workspace we can create a filter for excluding these kind of files.
This is done differently whether you are using the package explorer or
the navigator to navigate files with.
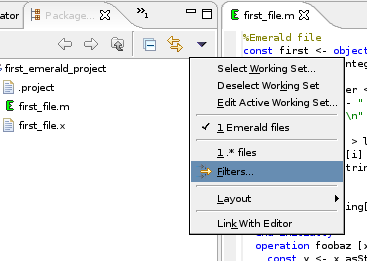
In the package explorer you choose the
'Filters' entry in the package
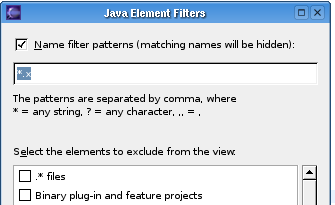
explorer drop-down menu (figure 1.9). Then you mark the
Name
filters patterns selection box and write
'*.x' in the text field (figure 1.10).
Figure 1.9:
Choose Filters...
|
|
Figure 1.10:
Put a mark in Name filter
patterns and write *.x in the text field
|
|
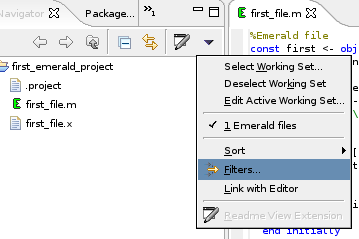
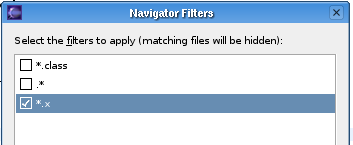
In the navigator you similarly choose the
'Filters' entry in the drop-down
menu (figure 1.11). In the navigator a filter has already
been set
up for you, so you just need to set a mark in the
'*.x' entry (figure 1.11).
Figure 1.11:
Choose Filters...
|
|
Figure 1.12:
Put a mark in *.x
|
|
Now, you might be thinking: Since the file I am editing is compiled in
the background, how do I find out if the compilation was successful or
not?
To handle errors I have used the eclipse marker system. This provides the
ability to attach a marker to a specific line in a file and
have this marker show up in the side panel when the file is being
edited. The markers will be listed in the Problems view (if the
Problems view is not visible in you eclipse setup you can activate it
by pressing 'Window->Show
view->Other...' and then choose
'Basic->Problems').
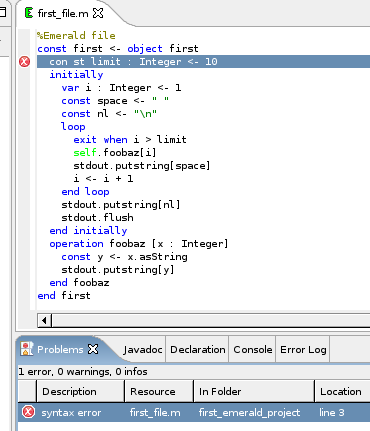
Let's try and see how it works. We will introduce a
simple syntax error into our program. You can do this by putting a
space in the middle of one of the keywords (the blue words by default). If you
do
this and save the file, the file will be compiled and you will get
something that looks like what i have captured in
figure 1.13.
Figure 1.13:
Error marker representing
a syntax error.
|
|
Now that we have a program, which is also compiled, we will run the
program. In eclipse you run programs through launch configurations.
Launch configurations can be accessed in the menus, through
'Run->Run...' (or by
clicking on the drop-down menu next to the green start button and
clicking 'Run...').
An easy way to create a new launch configuration for your program is launch
shortcuts.
First, select the editor of the file you want to launch, and then
click 'Run->Run
as->Emerald file'. This will create a
new launch configuration setup with standard settings and run it. The
result of running the program will be visible in the console view
(figure 1.14).
Let's take a look at the launch configuration which was
created when we used that launch shortcut. Click
'Run->Run...' to open the launch configuration window. Here you
will see the newly created
launch configuration under the 'Emerald file' entry.
It's called 'Launch first_file.m as
Emerald File'. Try to select it, and you will see that
you can choose between different options when running your emerald
files(figure 1.15):
Figure 1.14:
The result of running the
first_file.m program
|
|
Figure 1.15:
An emerald launch
configuration.
|
|
- Run distributed
Here you can choose whether or not to enable the distributed
capabilities of emerald. If you enable this option the
'Root Host' and the
'Run as Root Host' option will be
activated. For our first example, where we don't use
any distributed capabilities, we don't need to enable
this option.
- Root Host
Here you have to specify the address of the machine you want to
designate as root host of the network This should be an ip-address or
an URL. If you don't have a root node to connect to
look to the next option.
- Run as Root Host
Enable this option if you want to designate yourself as root node.
- File to launch
This is the name of the file that you want to launch. Notice that it
points to the first_file.x file and not to the first_file.m file.
This is because first_file.x is the compiled bytecode file that emx needs to
launch.
- Command Line Flags
Here you can specify any command line flags that you want to pass on to
emx when launching. They will be put directly into the command line
that will be run.
It is possible to run more than one instances of emx at the same time.
You just start the launch configurations one at a time through the
launch button or through the launch window. They will all be run in the
console view, and it is possible to switch between the different
instances via the console drop-down menu (figure 1.16).
you can
terminate instances running in the console by pushing the terminate
button (figure 1.16).
Figure 1.16:
Switch between different
instances of emx via the drop-down menu. Terminate instances on the
red terminate button.
|
|
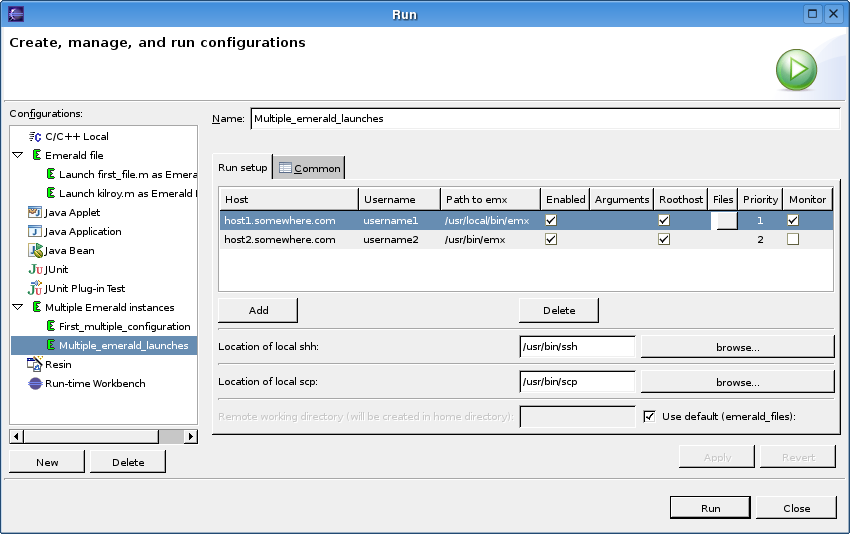
Emerald has an alternative launch configuration, called
'Multiple Emerald instances'. It is
accessible through the 'Run..' menu
as well (figure 1.17). This launch configuration enables you to run
multiple instances of emerald at the same time, either on the local
machine or on a remote machine through ssh. The layout for this launch
tab is a lot different from the previous one. In this launch configuration you can specify more than one launch at the same time by pushing the 'add' button.
The table where you specify your launches has different columns in which to setup each launch:
Figure 1.17:
Multiple emerald
instances launch configuration.
|
|
- Host
In this field you enter the hostname of the remote host where you want to launch emx. If you want it to be a local launch, you have to write 'localhost'. Launches on 'localhost' are treated differently than remote launches.
- Username
This is the username that you have to use to log in to the remote host through ssh. See section 1.2.10 for details on passwordless ssh logins.
- Path to emx
The path to the emx executable file on the remote host. This can, of course, also be any other executable you might want to run.
- Enabled
Setting to enable or disable running this host.
- Arguments
This is for commandline arguments that you want to be passed to emx. This can be anything, the arguments will be passed directly to emx.
- Roothost
Setting to enable or disable sending the roothost directive to emx (-R).
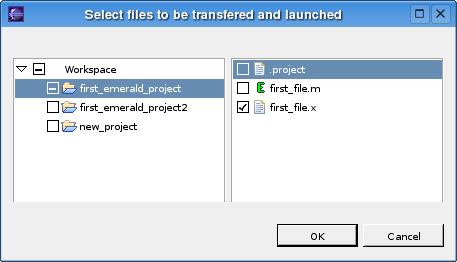
- Files
When you select this field in the table, a button will appear. If you click on this button a window will appear (figure 1.18), where you can select which files should be transfered to the remote host and added to the commandline given to emx.
- Priority
Select the priority of this command. In the example (figure 1.17) the first command have a priority of 1 and the second command have a priority of 2. This means that the first command will be executed 1 second after you push the button and the second command will be executed 1 second after the first command was executed.
- Monitor
This option let's you decide if you want to attach a monitor (ie. the console) to present the input/output of this command or if it should be launched in the background. This is a nice feature to have if you have some commands, that you want to run each time you launch emerald, but you are really not interested in their output, or they might have no output.
Figure 1.18:
Select which files in you project should be transfered to the remote host and added to the commandline.
|
|
Finally there's these three options to fill out on the launch configuration:
- Location of local ssh
You need to fill in where ssh is located, on the local machine. ssh is used to login to the remote hosts.
- Location of local scp
You need to fill in where scp is located, on the local machine. scp is used to copy over files to the remote hosts.
- Remote working directory
Here you have to specify the name of the working directory that should be used on the remote hosts. The directory is relative to the specified users home-directory (ie. if you specify 'first_remote_files' and your users home-directory is /home/username, the working directory will be /home/username/first_remote_files). If the directory does not exist it will be created. If you mark the 'use default' flag, the directory that will be used will be 'emerald_files'
Passwordless ssh connections to remote hosts
To be able to launch emerald on a remote host you need to set up some
encryption keys, so that you can log into the remote machine without providing a password.
This is out of the scope of this article but there's a very nice tutorial called "OpenSSH key management, Part 1" that details a way to set it up at: http://www-106.ibm.com/developerworks/library/l-keyc.html
Next: Bibliography
Up: Building an IDE plugin
Previous: Building an IDE plugin
2005-03-17
![\includegraphics[width=8.229cm,height=3.281cm]{using-img15}](img4.png)
![\includegraphics[width=9.234cm,height=3.863cm]{using-img13}](img2.png)
![\includegraphics[width=13.183cm,height=10.077cm]{using-img14}](img3.png)